|
Supplies Local | I like | Buildings | Lore | Mowers | Floral Art | Books | Pests | Power Tools | Site map | Clothing | Green lifestyle |
||

Making A Bird Table
[navbars/I_like.htm]|
|
You will need:
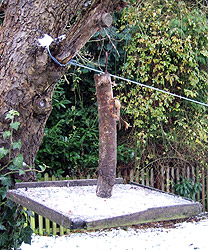
Pictured left is my original table of this design outside the kitchen window hanging from an apple tree. It has been here for about 5 years (maybe more - I forget exactly) with the only attention being to scrub it clean every now and then and to replace two of the side pieces when they fell off (as a result of over vigorous cleaning). Since the first one I have made several more as gifts for friends. The whiteness is due to a sprinkling of snow. |
 1
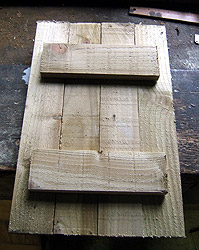
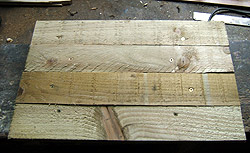
- Find wood, cut to size 1
- Find wood, cut to sizeThis somewhat rough and ready bird-table is quick to make (these pictures detail my making one in about an hour). It is very effective at its job being open so that the birds using it feel safe (something that twee little thatched roofs prevent as they allow predators to sneak up unawares), sufficiently large to get lots of food and several birds at a time on and as it hangs from a tree branch uses little in the way of materials by not needing to have a large stable base. The "unstable" nature of the table when birds land seems to be something that they quite like as I suppose it acts like a tree branch or twig swinging with their arrival. You need to find enough wood to make a base around 12" x 18" (30 x 45cm) exact size is unimportant. It is important however to have proper wood rather than ply (unless specifically for outdoors) or some sort of composite board as these will start to fall to pieces after a while when they get wet. The wood should be reasonably thick or it will warp too much when subjected to the weather, here I am using 4 pieces of about three quarters of an inch thick timber that is a left over gravel board from a fence I built last year. |
|
 2
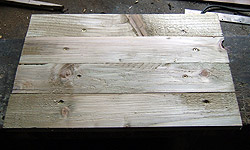
- Attach bits of wood to each other 2
- Attach bits of wood to each otherAssemble your wood loosely for the base and place two further pieces across them to hold them together as shown. These are about 3" wide. Using nails or screws that are about one an a half times the thickness of the wood you are using (so they don't poke out the other side) screw or hammer them together. I used a power driver to drive these in without any pilot holes needed as long as they aren't too close to the edge of the wood when they may split it. This is the underside of the table. |
|
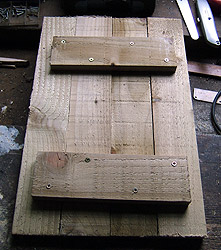
 3
- Turn table over and fix again 3
- Turn table over and fix againFlip the table over and screw or hammer more fixings in place to make the table good and solid. Countersunk screws are the best and can be power driven into the wood so they are flush with the surface or slightly below it ready for the next step. |
|
 4
- Give table a smooth surface if the wood is a bit rough 4
- Give table a smooth surface if the wood is a bit roughThis wood was particularly rough in finish which would make it more difficult to clean properly. Also the pieces weren't properly flush so I planed it down to a better smoother finish. Make sure you drive the screws in below the level of the surface if you do this so you don't hit the planer blade on them. A power sander would do a similar job. It doesn't need to be furniture grade smooth, but if it's too rough it may retain bits of food which will rot and so make the birds ill. If your wood is planed to start with you may be able to skip this step. |
|
 5
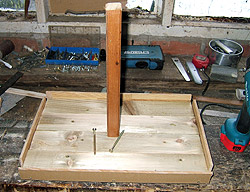
- Make a lip around the table to stop food falling off 5
- Make a lip around the table to stop food falling offThe table is given a large lip around the edges so that food on the table doesn't fall off too easily - when birds land on it and it swings for instance. The lip should be the thickness of the base plus about another inch by about a quarter of an inch or so thick. Note that the lips on the shorter edges have a gap of about an inch at each end. This makes it easier to clean with a scrubbing brush as it lets the water and muck run off easily. 6 - Attach a vertical post to hang the table from The vertical post has been added. In this case I used a piece of timber from some unwanted furniture I took to pieces. In the table at the top of this page I used a piece of a branch from the apple tree the table is hanging from when I pruned it. I prefer the rustic look, but you have to be careful about cutting the bottom face so that it hangs properly and not at an angle. Serious fixings are needed to attach the vertical hanger to the table, 2 thick and long screws for the one here for instance. Put in long pilot holes so you don't split the timber, I used a torque driver to push the screws in, a 12v+ drill driver should manage the job, otherwise take it slow, in either case watch the timber doesn't split. |
|
 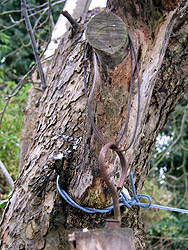 7
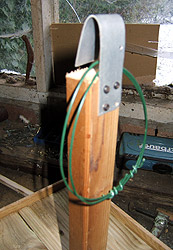
- Add a hanger 7
- Add a hangerFinally a substantial hanger is needed. I attach a hook to the vertical post and then use a double loop of garden wire to go around a branch, if the branch is living then cushion the wire with something - I find dark plastic to be the best material, folded over several times it cushions the branch against the wire and a dark colour makes it unobtrusive. The hook can be of whatever you have to hand. The left one is of a bent piece of strip metal, the right one is of a cut off barbeque skewer, bent by 90 degrees into a loop and held in place with a heavy woodscrew. The table should be hung somewhere exposed so that the birds can see around them and aren't worried about being ambushed by the local moggies. |
|
| What to put on the bird table | |