How to Plan and Build a Patio
A patio enhances the usefulness of a garden by providing a dry-foot area all year round, where you can go into the garden without walking on damp or soggy grass. If next to the house adjoining patio doors it feels like an outdoor extension of the house, a flat dining, seating and play area that greatly extends the seasons that you can use the garden as an extra living space.
Planning the patio
![]() Choose the slabs or bricks you will use to build your patio
to harmonise with the bricks of your house, the eye naturally
connects the two, being similar sorts of surface. Dark colours
are less reflective and therefore don't give so much glare,
which can be very strong in the full summer sun. A darker coloured
slab will also feel warmer than a lighter one, and will retain
- and radiate heat well into the evening after the sun has disappeared.
Choose the slabs or bricks you will use to build your patio
to harmonise with the bricks of your house, the eye naturally
connects the two, being similar sorts of surface. Dark colours
are less reflective and therefore don't give so much glare,
which can be very strong in the full summer sun. A darker coloured
slab will also feel warmer than a lighter one, and will retain
- and radiate heat well into the evening after the sun has disappeared.
I recall seeing a path once that someone had laid covered in white gravel, as it was in a sunny position, on a bright sunny day it was painful to look at.
 10' x 10' Garden Must Haves Pandora Leaf Adjustable Garden Gazebo (3m x 3m)
 12' x 10' Garden Must Haves Pandora Leaf Adjustable Garden Gazebo (3.6m x 3m)
 Forest Circular Wooden Garden Picnic Table 6'x6' (1.8x1.8m)
![]() Too many contrasts and too much variety looks confusing.
Never have more than three types of paving, including bricks
or edging materials, just one or two also works very well,
the effect soon becomes messy if you have more. If you want
the patio to have a pattern rather than be an expanse of uniform
slabs, then consider circles or arches made of the same bricks
/ slabs rather than different types or colours. Different patterns
in one colour look more sophisticated than different colours
of one type of slab or brick.
Too many contrasts and too much variety looks confusing.
Never have more than three types of paving, including bricks
or edging materials, just one or two also works very well,
the effect soon becomes messy if you have more. If you want
the patio to have a pattern rather than be an expanse of uniform
slabs, then consider circles or arches made of the same bricks
/ slabs rather than different types or colours. Different patterns
in one colour look more sophisticated than different colours
of one type of slab or brick.
![]() A contrasting edge can look very effective, say of block
paviours (as used for drive-ways) around patio slabs with the
darker colour on the outside.
A contrasting edge can look very effective, say of block
paviours (as used for drive-ways) around patio slabs with the
darker colour on the outside.
Remember that if you are replacing existing slabs, you will also need to replace those making the path around the house at least to where it disappears around a corner, or the effect will be lost.
Laying a patio
Whichever way you look at it, this is a heavy job and having seen lots of patios laid by amateurs where the slabs are uneven / wobble and / or have grass and weeds coming up between them, I'd strongly advise you to leave it to the experts unless you are able (that's able - not confident, there's a difference).
If you do feel able to make a good job of it yourself, then get a guide book or leaflets often available free at your local builders merchant or garden center. It's always a comfort to be able to refer to something in print, especially when you think you've taken a wrong turn.
A professionally laid patio will usually represent about 3 or 4 full days work, depending on the size, an amateur laid patio can stretch out over several weekends.
The commonest mistake and cause of a patio not being level or stable is that the base is not prepared properly. Don't skimp on the foundation, dig down far enough, have a thick layer of hardcore, compact it down with a mechanical vibrator and bed the slabs on a good layer of mortar.
 8' x 16' Forest Patio Deck Kit No. 1 (2.4m x 4.8m)
 8' x 16' Forest Patio Deck Kit No. 2 (2.4m x 4.8m)
 8' x 16' Forest Patio Deck Kit No. 3 (2.4m x 4.8m)
 8' x 16' Forest Patio Deck Kit No. 4 (2.4m x 4.8m)
 8' x 16' Forest Patio Deck Kit No. 5 (2.4m x 4.8m)
 8' x 16' Forest Patio Deck Kit No. 6 (2.4m x 4.8m)
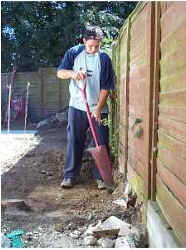
Dig down about 6 inches below patio level.
Here a trenching spade is being used on particularly difficult soil. Check the level of this using a spirit level and wooden pegs. It is not important that it is completely flat, but a bump of soil will mean less hardcore and a less stable foundation.
Soil that is removed will have to be disposed of. Sometimes it is possible to do this in the same garden, filling a low area, building up beds, going towards a rockery or raised bed etc. More often it will need to removed in a skip.
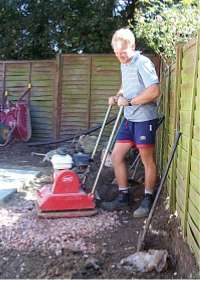
Hardcore is then laid and leveled before being compacted with a "wacca" plate.
Unless you are laying the patio over a short time period (and remember it takes the professionals a few days from start to finish) it might be a good idea to order heavy materials as and when they are needed. Hardcore first, then sand and cement and slabs later.
The alternative is that you may not be able to use your garage for a while as there's a few tons of building materials on the driveway - or half your front lawn gets killed while the materials sit there for an extended period.
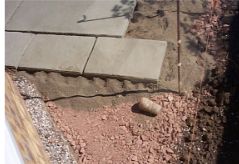
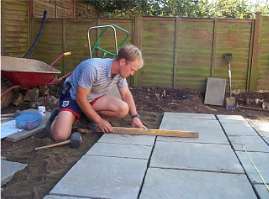
Lay slabs on a dry mortar mixture
1 part cement to 5 parts sand, using builders lines for reference at the edge of the patio.
The first slab down is the most important as the others are all referenced from this. Make sure it is the right height and at the top of the 1" in 6ft slope. If the patio is adjoining the house, this is where you should begin.
Make sure the slabs are below the level of the damp proof course.
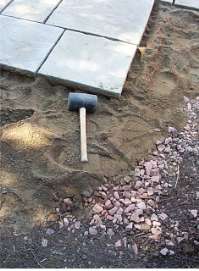
A rubber hammer is used to bed the slabs down and get them level. Fine adjustments can be made thanks to the mortar layer.
When placing slabs, take care not to stand them on edge and then lay them down, this will disturb the mortar layer unduly, lay them flat directly.
Always work from the mortar / hardcore side of the work, don't tread on slabs that you have already laid.
Use a spirit level with each slab, and double check! Mistakes are not easy to rectify.
Remember the slope 1" in 6ft - away from the house (use a 1/2" piece of wood under one end of a 3ft spirit level - or proportionally for different sizes).
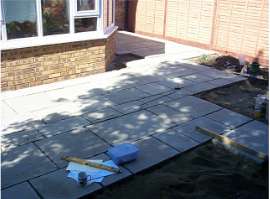
When all slabs have been laid, brush a dry mix of mortar into the joints between them.
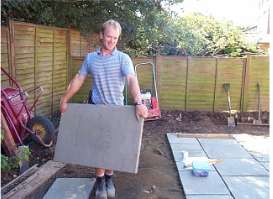
Slabs are big heavy things!
Take care in lifting and carrying them
Use a wheelbarrow wherever possible
Wear gloves when handling slabs (not like Sid here!)
Stack them on end for storage leaning against each other
Accurate measurement and laying out of guide lines is vital
A small error is soon magnified when the patio is several metres across. Don't walk on the patio for a few days until the mortar mix has hardened.
When all slabs are laid brush a dry mortar mix between the gaps
If laid properly, you won't get any growth between the slabs and you will have extended your effective living area quite considerably.
With thanks to Sid and Carl - Sid Bibby Turf and landscaping - Cambridgeshire and neighbouring counties
Q. I have a pre-walled area, 9ft wide, decreasing to 8ft 6". Total length 11ft 8". I have purchased Riven paving slabs, 2ft x 2ft. What is the best way to lay the slabs with regard to the decreasing width?
A. You have a choice:
1/ Cut the slabs by hiring a machine to do the job. A hard, tremendously noisy and laborious process, but necessary if you want an edge-to-edge finish.
2/ After laying and compacting the hardcore lay the slabs without cutting any. This will leave gaps along one edge which can be used as planting pockets - dig the pocket of hardcore out first after the mortar for the slabs have set. Otherwise the gaps can be filled to level with the slabs with gravel or other decorative stone - by far the easiest option and good looking too.
Q. I have a large concrete patio at the moment and wanted to lay slabs over the top to make it look nicer. The 4" height rise would take me above the 150mm (2 brick) damp proof line, can I do this by keeping a gravel about 8" near the house walls so water can run off or do I need to break up the concrete?
A. I wouldn't risk it, don't take it above the damp-proof course, remove the concrete first, it'll be worth the effort in the long run.
Q. I have an existing patio which is made up of light grey slabs. The patio is solid. I would like to have a new patio possibly York stone. Is it alright to lay a new patio on top of the existing one. If so would a dry mix be suitable to bed the new patio.
A. The short answer to your question is yes you could lay the new slabs on top of the old, I'd use a wet mix of 5 large blobs of cement per slab though - more for larger ones. However more to the point, I wouldn't do it at all.
First of all your new patio would be about 4 inches higher than at current which may cause problems, look odd or both. Secondly it's not the best way to go about things and with York stone being about the most expensive material for a patio you can get, you'll want to do it properly. If your current patio is of slabs, then they should come up without too much difficulty. If it appears solid, it's probably because they've been well laid rather than because they're immoveable. You need to get a couple of crowbars or similar and place them against the edge of one slab, sharp end down the crack, then move them alternately back and forwards to lift the edge up. Once one's up the others will come easier. You can then use the existing sub-base to lay the new slabs on.
Copyright 2000 - present. All Rights Reserved | Privacy Policy Statement